
How to Paddle a Kayak?A Guide for Beginners
How to Store Fishing Rods? Steps Here for You!
August 22, 2023
Kayaking seems to be an easy sport. If you love exploring anywhere in the waters, this sport is perfect for your first inclination. But do you know how to paddle a kayak?
Congratulations, you’ve come to the right place!
This book is great for beginners because it has thorough tutorials that give you a quick look at the techniques and basics.
But every sport is dependent on diligent practice. While kayaking sounds like all you have to do is keep your balance.
Ready to get started? Follow me.
How to Wear a Life Jacket?
Wearing a life jacket is a step not to be overlooked before learning to kayak. Remember, this is very important for your safety. It can protect you in critical moments!
So, keep the following points in mind:
â—Ź Clip in the bottom buckle.
â—Ź Close the front or side zipper.
â—Ź Tighten the side straps.
| Common mistakes Need to clip the bottom strap buckle. The bottom straps are the most important part of keeping your life jacket in place. It makes swimming easier and works if you fall into the water. |
Preparation before Paddle a Kayak
Here are some of the basics of kayaking. Only by getting it right can you learn the sport safely and efficiently.
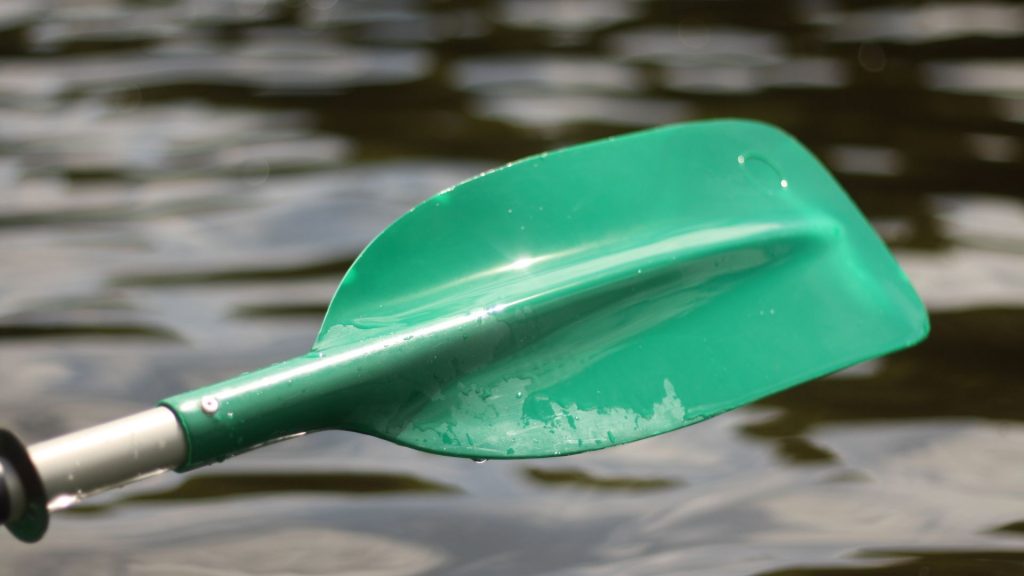
1. Understand the paddle blades:
â—Ź Are the blades matched (parallel) or pinned (at an angle to each other)? It is easier to learn with matched blades. If yours has feathers, look for a button in the center of the shaft and a hole around the shaft. Press the button and rotate the two half shafts until the blades are parallel.
â—Ź Are the blades asymmetrical? If one side of each blade is a little shorter than the other, then the answer is “yes.” When you paddle into the water, this shape helps the paddle stay on a straight trajectory (rather than spinning). If you see a uniform oval shape, you have a “symmetrical” blade. You can learn to paddle with any blade type – you need to know which one you have.
â—Ź Is the blade slightly concave (curved)? The answer is usually “yes,” so notice where the concave side faces when you hold the shaft. This shape allows you to “grab” more water, resulting in a more powerful stroke.
2. Hold the paddle correctly:
Pick up the paddle, hold it in front of you, and check three things:
â—Ź You want your big knuckle pointing up and your blades perpendicular to the ground.
â—Ź The shorter part of each blade should be at the bottom. (Don’t worry if your blades are the same size.)
â—Ź You want the side of each blade that curves toward you to face you. (Don’t worry if your blades are flat as a pancake.)
If you aren’t holding the paddle this way, turn it over so that your hand and blade face your desired direction.
3. Adjusting the shaft position:
â—Ź Place the center of the paddle shaft over your head.
â—Ź Now, change how you hold the shaft so that your arms form a 90-degree angle.
When you put the paddle in front of you, you will see the “paddler’s box,” a shape made by the shaft, your arms, and your chest. Keeping this box in place as you hit the ball will help you turn your body correctly, which is another key to good form.
4. Relaxed Grip:
If you hold things loosely, your arms, wrists, and hands will only tire slowly. It also tells you to move the paddle with your core:
â—Ź Draw an “O” around the shaft with your index finger and thumb.
â—Ź Then gently place your other fingers on the shaft.
| Common mistakes â—Ź Holding the paddle tightly. Wiggle your fingers to loosen your grip while paddling. It prevents blisters and tension. â—Ź Narrow grip. Use a wide grip distance from your shoulders or wider for more stroke power. |
Pay Attention to Your Seating Position and Paddling Position
A second thing beginners often miss is the right way to sit and stand. It is often affected by how you adjust your kayak gear:
â—Ź Sit straight, shoulders relaxed, and chest open, and avoid hunching over. Choose a seat with adjustable backrest support, but don’t lean on it like you’re hanging out on the beach.
â—Ź Lean your feet against the footrest with your legs straight but engaged. Keeping a slight bend allows you to use your legs as leverage more effectively.
â—Ź The leg braces should rest against your upper thighs, not your knees.
You will remain “connected” to the kayak while remaining comfortable.
Anatomy of Paddle a Kayak
The anatomy of paddle paddling can be divided into three distinct phases:
- the roll-up phase – The roll-up refers to the body’s position throughout the paddle. The torso needs to be wound in the same way as the first stroke. Keep your lower arm almost straight. Your upper arm should be slightly bent, and your hand should align with your face.
- Catch Phase – This phase is the time it takes for the paddle to enter the water. Relaxing your torso will pull the paddle into the water – but not with your arms. The core muscles should do most of the work.
- Relaxation or Recovery Phase -In the end, you can recover; good balance can help you make the next move well. Your arm controls the movement of one paddle blade up out of the water. The other paddle blade moves down, and you’re ready for the next stroke.
Each movement should be smooth and consistent. And the three steps should flow into each other.
You may need to modify them for specific strokes, but they should still be there in most cases.
How to Paddle a Kayak: (Still Water)
Next, it’s time for the most exciting step of all! It is the final hurdle in your beginner’s journey.
Hang in there, and victory will come.
The following are summarized in 5 key points!
Let’s start to paddle a kayak!
Forward Kayaking
Forward paddling is the most important part of kayaking because it’s how you get from one place to another or discover new things.
- Place the blade in the water
Turn your body a little bit and put the blade in the water near your feet to completely submerge it.
The blade should enter the water’s edge first rather than face first. - Pull back
Release the paddle and pull the blade back along the side of the kayak, rotating your torso as you pull. As you pull back, try to keep the blade as close to the edge of the kayak as possible.
Pushing the shaft with your other hand and pulling it back with your power hand is also useful. - Removing the Blade
When the blade is in a straight line with your hips, pull it out of the water, starting with the edge, and then do the same thing on the other side.
Tip:
The closer the blade is to the boat, the more likely you will paddle in a straight line.
| Common Mistakes â—Ź If your kayak is not going in a straight line, make sure you are looking where you want to go. Choose a stationary object (tree, rock, etc.) and focus your eyes on it as you paddle toward it. Beginners often watch every stroke, which can throw them off course. As you spend more time in the boat, the length of each forward stroke will change slightly to keep you on track. â—Ź If your arms feel fatigued, you may be over-flexing them. It may look as if you are riding a bicycle with your arms. Try keeping your arms straight and pushing with your feet on the same side of the paddle. |
Paddling the kayak backward
A reverse or backstroke is the opposite of a forward stroke and allows you to travel backward. You may only sometimes need to use the reverse stroke, especially if you can turn around.
- Place the blade on your hips
The forward stroke stops at your hips, where the backward stroke starts. Turn your body to submerge the blade near your hips underwater fully.
You don’t have to turn the blade because the back side of the blade is used instead of the power side during the backward stroke. - Push through the water
Put the blade under the water and use your power hand to push it through the water toward your feet. As you push the blade, your body should turn. - Put down your blade
After pushing the blade along the side of the kayak toward your toes, release the blade from the water. Since you should turn your body as you paddle, you should be in the right place to do these steps again on the other side.
Tip:
Make sure your blade hits and leaves the water’s edge first to make it work better and make less water splash.
| Common Mistakes â—Ź Leaning back while paddling. When you lean back, you put pressure on your lower back, relax your core muscles, and make yourself less stable. Make sure you sit up straight when paddling in reverse. â—Ź Not going straight. Be patient. It takes a lot of practice to become proficient at backward paddling. To stay on track, try taking shorter strokes and focusing on what’s right in front of you. |
Left/Right Turns
- Extend your blade forward
Rotate your torso so you can extend your blade forward. Place your blade into the water near your toes as if you were paddling forward. You may go beyond the usual forward stroke cutter entry point.
Remember to reach the other side of the direction you want to turn. For example, if you want to turn right, you must put the blade into the water on your left side and vice versa. - Sweep.
Instead of pulling straight back as if you were paddling forward, extend the blade in an arc as you pull back. It allows you to create a semi-circular motion with the blade as it moves toward the stern (rear) of the boat.
Rotate your torso as you sweep; this helps maintain the arc and increases efficiency. - Remove the blade and repeat
After completing the arc, remove the blade from the water. At this point, your blade should be near the stern of your kayak.
Repeat these steps until your boat is fully turned.
Tip:
The wider the sweep, the sharper the turn should be.
| Common Mistakes â—Ź Not securing the blade. Slowly bury the blade in the water and begin sweeping. â—Ź Hands too high, resulting in deeper paddling. Keep your hands below your chest and sweep the paddle across the kayak in a wide arc. Think slow, low, and wide. |
Stopping the kayak
The kayak is not equipped with brakes, but you can use the paddle to stop the kayak effectively. To stop, use strong, short, undulating strokes in the opposite direction of travel.
- Continue forward– Alternate between three and four strong, short, undulating strokes oppositely.
- Backward-Alternate 3 -4 powerful, short, undulating strokes forward.
| Common Mistakes â—Ź If your kayak is turning, you are not alternating sides, or your stroke is too long. â—Ź During the stroke, if you feel unsteady or lose your balance, sit straight with your nose above your belly button. |
Charting the stroke
The draw stroke is versatile when you want to get close to something. You can use it to stop next to your friends to share a snack or next to a dock to land.
- Facing the direction you want to go
- Extend the paddle in the direction you want to go (use the right-hand paddle if you are going right)
- Secure the lower blade in the water
- Keep the top hand relaxed and at eye level (it will act as the pivot point)
- Pull the lower blade toward your hips, stopping 6 inches from the kayak
- Push the top hand toward the front of the kayak to cut the blade out of the water
- Repeat if necessary
Tip:
If you want to move to the side, try pulling the blade straight toward you. If you move too far forward or backward, you could cut yourself.
| Common mistakes â—Ź You need to rotate your chest in the direction you want if this will hurt your shoulders. â—Ź Not securing the blade. Burying the blade in water to get your hands wet. |
Safety Tip
If the paddle hits the side of the boat, don’t try to pull the blade out of the water. It could cause the boat to tip over and sink. If you feel it hit, just let go of the hand above you or relax your body and start over. Don’t pry – retry.
| how to clean pruning shears how to sharpen pruning shears how to clean hiking shoes how to string a fishing rod how to store fishing rods |
Conclusion
Get in touch with nature and burn calories. There may be many reasons why you want to take up the sport of kayaking. But it all requires a certain foundation – how to paddle a kayak?
If you are a beginner, then it may be a long process to get the knowledge quickly.
But take your time. The process of working towards your interest could be a better memory.
You now know the basics of kayaking, which is a good achievement.
So, make sure you stick with it and never give up. Constant practice is the best teacher.
Cheer up together!


